No new post since March...now it's September. Blog fail.
Um. Well I'm at work now so I can't really spend too much time on this, but I have been birthing guitar bodies like the mother in Life of Brian. Just kidding, that's a gross metaphor...it made me snicker tho...but I'd never let my babies fall to the floor. ;)
Well for a quick update...so far I've made over 30 guitar bodies, given two guitars as gifts, made one for my bro-in-law, one for my bass player, and one for a stranger I met on Ebay who bartered the other half of his pieces of wood to build it. I'm gonna have to do photographs in a chronological order on the next post since some of them came out really well.
At this point I'm ready to move to the next level of being a luthier. I started with the Fender bolt on design where the neck and body were independent and the necks were universal and store bought. Now I'm moving to the Gibson shapes (still flat tops) but since these are glue in neck designs, I need to start learning how to build necks. So back to the Fender design...the bolt on neck is first, then the set neck. But this means building jigs... :\
Well more photos in the next blog...so until then...whenever that is...
Wednesday, September 14, 2011
Monday, March 21, 2011
New tools...new noise...
I picked up my Jet drum sander this past weekend in Gilbert Arizona. No pics of the new toy unfortunately. I forgot to take them as I sanded through a few boards and cleaned up a few glue-ups...but I did take it for a test drive and it works like a charm. I found a great deal in Craiglist on their 22-44 model (max width in one pass is 22", or two passes flipped = 44"). Normally Craiglist is for people trying to get rid of their crap for an excessive amount of money and there's something usually wrong with it. I usually buy on ebay due to that reason. But this time it was a good deal. 8 month old drum sander used for one project for maybe 10-15 min, owned by a professional cabinet maker. Its a tad large though and ridiculously heavy. I can already get the feeling my pops ain't too happy storing it at his house, but its just not feasible to move it back and forth every weekend. I gave it a nice little cubbie hole in his garage, but still--its massive and its a legit concern from dad.
I started another project for my drummer Jason's nephew, Nolan. Apparently his birthday is coming up and and this 16 yr old needs a respectable guitar to play on instead of the POS Dean he has...
I thought I'd document as much as I could. I kept forgetting to take pictures but I think I got most of it through the process.
First thing is to get a board from the lumber store. Usually they are trimmed up for the most part. The board I chose was 8/4 Ash. 8/4 means there are eight 1/4", meaning 2", but usually that translates to 1.75". A standard Fender body is 1.75" thick so we are good to go. G2G! I need 13" at the widest bout so its either find a 13" wide piece (difficult to find) or glue up two boards to make the 13" (easier to do). I select an 8" wide board that is 10ft long, which will allow me to make 3 complete bodies. My typical searching sizes is 7+" x 40" for one center joined guitar blank, although have used as short as 7"x 36". Knowing these sizes I have the lumber store chop them into three identically lengthened pieces.
I know I only need two 7"x16" pieces, but I measure out 20" as that is the typical length for a Stratocaster style body. Since this is already mostly sanded on the faces, I can skip the thickness sanding portion of the build. So next step would be using the miter saw (aka the chop saw) to chop the correct lengths for both halves. The chop saw has a 1/8" wide blade, so you have to factor that material disappearing in your lengths. No big deal here since I have an extra ~4". Usually before I do the actual cutting I trace half the template on the raw wood to see what grain shapes will be in the body. Below you can see that the center sections will have mostly straight grains, and towards the edges there's a little flair akin to what you'd see around a knot, or a growth ring.
 Once the board is split, I'll want to glue the pieces together with little to no gaps. In order to bring the pieces together seamlessly, the joints need to be perfectly flat and perpendicular to the faces as bumps and dips cause air gaps an dlack of strength when gluing. First is to get the perpendicular face - aka getting it "square". To do this you use a table saw, as it's blade is 90 degrees to the table. Set the fence so that you are taking off no more than an 1/8" at a time. Use a push stick to push the board into the fence as you feed it thru. This keeps the board from "fish-tailing" during the cut.
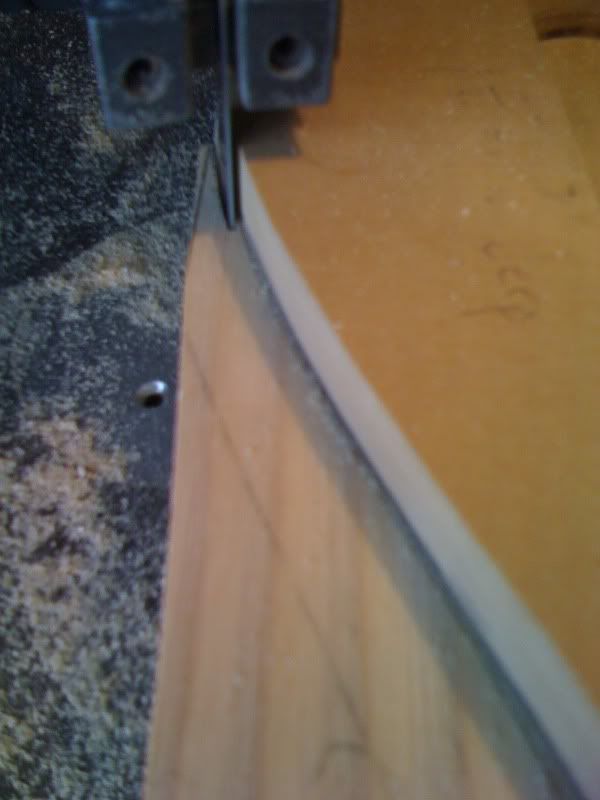
 With a good blade your cut will be perfectly flat. Unfortunately mine never are, so you have to get the side smoother. Normally you would use a jointer to create this, but I'm not a fan of my jointer, so I use my router and a straight edge to replicate the function of the jointer. The straight edge is a clamp/ruler-mix and so far it has worked like a charm. I'm using a 36" clamp I bought from Rockler. Since this is center joined, its not excessively crucial to align grain direction perfectly parallel...just close enough so the straight grain doesn't create a V shape. The board is clamped and I use a 2" top bearing router bit to cut the stock.
 Once these joints are made, you glue up the pieces. I forgot the photos from this step, but you essentially use a wood glue (I use Titebond), spread the glue out like you are painting the face of it (ie. no bare wood showing) and squeeze the crap out of the pieces so the glue dribbles out. Try to maintain minimal "lip'ing" in the process. I use my fingers to determine if the faces are equal. Occasionally I get a "lip" and I have to sand it down so that the center is smooth. Fortunately the drum sander will solve this issue. Generally I'll glue them up in the evening, and leave the clamps on overnight so that in the morning they are fine to start cutting into. Below is the glued product.
 After the blank is joined (like above), you trace your shape on the wood, chop off any excess portions with the bandsaw, and drill your reference locations. I always use the center line for everything, since all my bodies are built by hand. I use the neck plates holes for reference, and two of the string thru holes. To maintain a cleanness and for wood grip, I only drill partially through the wood, not all the way through.

After the reference holes are drilled, I go back to the band saw and cut the wood so that there is maybe a 1/32" excess around my drawing. I have a few spare templates due to mess ups that I use as a visual reference since the bandsaw tends to shake the body to where its a little difficult to be precise on where to cut.

When you are done with the bandsaw a second time, you'll have something close to a shape...like this...
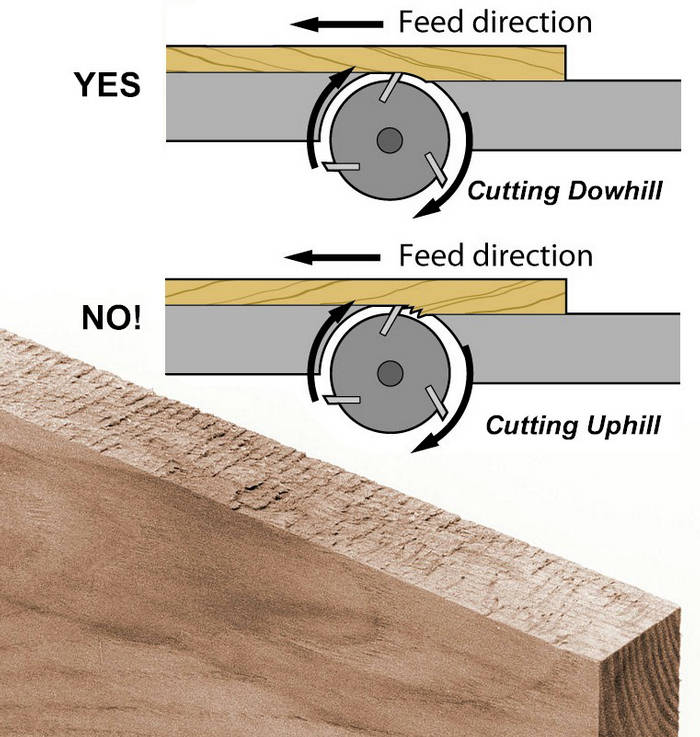
Once I've sanded off as much wood as I can, I then take it to the router table. One key element of using the router is knowing your wood grain direction and your router bit's cutting direction. You'll want to cut "downhill" of the grain, or with the grain, as in the first image. In the second image the cutting is going into or against the grain, and in some cases you have no choice but the do this, so the least amount of wood you need to do that with the better. The alternative to this is flipping your body over, but this generally means moving your template to the back, or moving the bearing location by using a different router bit.I started another project for my drummer Jason's nephew, Nolan. Apparently his birthday is coming up and and this 16 yr old needs a respectable guitar to play on instead of the POS Dean he has...
I thought I'd document as much as I could. I kept forgetting to take pictures but I think I got most of it through the process.
First thing is to get a board from the lumber store. Usually they are trimmed up for the most part. The board I chose was 8/4 Ash. 8/4 means there are eight 1/4", meaning 2", but usually that translates to 1.75". A standard Fender body is 1.75" thick so we are good to go. G2G! I need 13" at the widest bout so its either find a 13" wide piece (difficult to find) or glue up two boards to make the 13" (easier to do). I select an 8" wide board that is 10ft long, which will allow me to make 3 complete bodies. My typical searching sizes is 7+" x 40" for one center joined guitar blank, although have used as short as 7"x 36". Knowing these sizes I have the lumber store chop them into three identically lengthened pieces.
I know I only need two 7"x16" pieces, but I measure out 20" as that is the typical length for a Stratocaster style body. Since this is already mostly sanded on the faces, I can skip the thickness sanding portion of the build. So next step would be using the miter saw (aka the chop saw) to chop the correct lengths for both halves. The chop saw has a 1/8" wide blade, so you have to factor that material disappearing in your lengths. No big deal here since I have an extra ~4". Usually before I do the actual cutting I trace half the template on the raw wood to see what grain shapes will be in the body. Below you can see that the center sections will have mostly straight grains, and towards the edges there's a little flair akin to what you'd see around a knot, or a growth ring.
 Once the board is split, I'll want to glue the pieces together with little to no gaps. In order to bring the pieces together seamlessly, the joints need to be perfectly flat and perpendicular to the faces as bumps and dips cause air gaps an dlack of strength when gluing. First is to get the perpendicular face - aka getting it "square". To do this you use a table saw, as it's blade is 90 degrees to the table. Set the fence so that you are taking off no more than an 1/8" at a time. Use a push stick to push the board into the fence as you feed it thru. This keeps the board from "fish-tailing" during the cut.
 With a good blade your cut will be perfectly flat. Unfortunately mine never are, so you have to get the side smoother. Normally you would use a jointer to create this, but I'm not a fan of my jointer, so I use my router and a straight edge to replicate the function of the jointer. The straight edge is a clamp/ruler-mix and so far it has worked like a charm. I'm using a 36" clamp I bought from Rockler. Since this is center joined, its not excessively crucial to align grain direction perfectly parallel...just close enough so the straight grain doesn't create a V shape. The board is clamped and I use a 2" top bearing router bit to cut the stock.
 Once these joints are made, you glue up the pieces. I forgot the photos from this step, but you essentially use a wood glue (I use Titebond), spread the glue out like you are painting the face of it (ie. no bare wood showing) and squeeze the crap out of the pieces so the glue dribbles out. Try to maintain minimal "lip'ing" in the process. I use my fingers to determine if the faces are equal. Occasionally I get a "lip" and I have to sand it down so that the center is smooth. Fortunately the drum sander will solve this issue. Generally I'll glue them up in the evening, and leave the clamps on overnight so that in the morning they are fine to start cutting into. Below is the glued product.
  After the blank is joined (like above), you trace your shape on the wood, chop off any excess portions with the bandsaw, and drill your reference locations. I always use the center line for everything, since all my bodies are built by hand. I use the neck plates holes for reference, and two of the string thru holes. To maintain a cleanness and for wood grip, I only drill partially through the wood, not all the way through.
After the reference holes are drilled, I go back to the band saw and cut the wood so that there is maybe a 1/32" excess around my drawing. I have a few spare templates due to mess ups that I use as a visual reference since the bandsaw tends to shake the body to where its a little difficult to be precise on where to cut.
When you are done with the bandsaw a second time, you'll have something close to a shape...like this...


Here's another photo that describes the direction to cut.
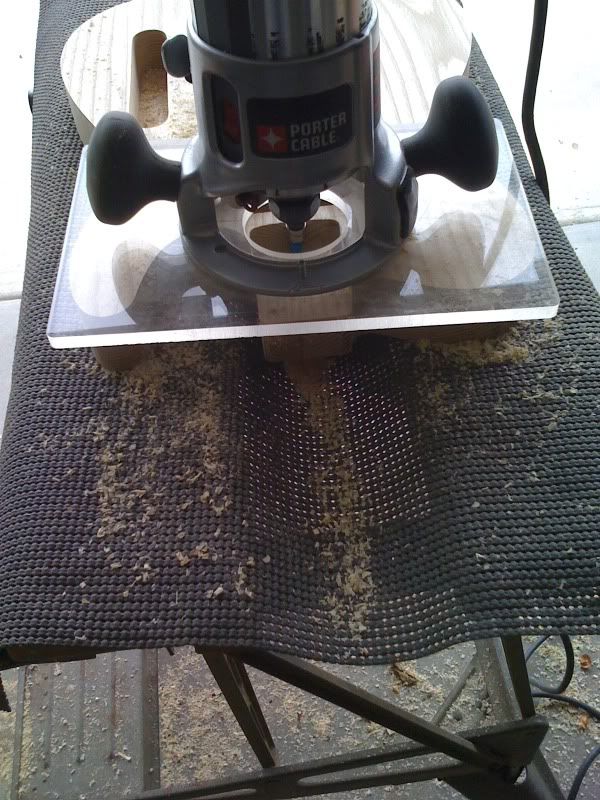
 Once the basic shaping is done you can start into the pickup channels. I leave the round over and neck pocket for last since having the template solid in place is key for the pickup channels. Generally I drill 90% of the depth with a Forestner bit and rout the final depth. Forestner bits are good as they leave a smooth circular cut. Regular bits leave a frayed circle. The downside to Forestners is that there is a center alignment point that is about an 1/8" deep, so you'll get a bunch of little drill dots in the process. Kind like I got in this photo (from another build). Doing the final depth with a router bit leaves a flat bottom.
Here's pics of the pickup channels and the control channel cut. The control channel has a 1/4" bottom (ie. 1.5" are cut away), so usually I'll cut 1" depth with my 1" long bit, then remove the template and run the bearing on the previously cut area to get the final depth.

And the end result

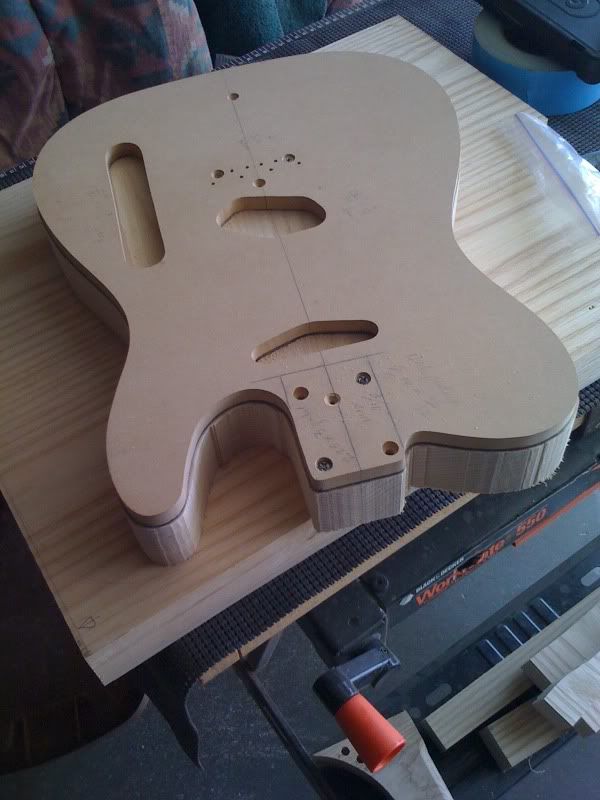
Once this is done I have cut the neck pocket and round the body over.
 After all that I hand sand the body from 80 grit to 120 grit to 180 grit to 220 grit. I use an orbital sander for the faces and slide it along most of the edges. Inside the horn and over the round-over is all hand sanding. Once you are done with that it's off to finishing. Usually I build the guitar up just to make sure all the parts are aligned first, then I finish it.
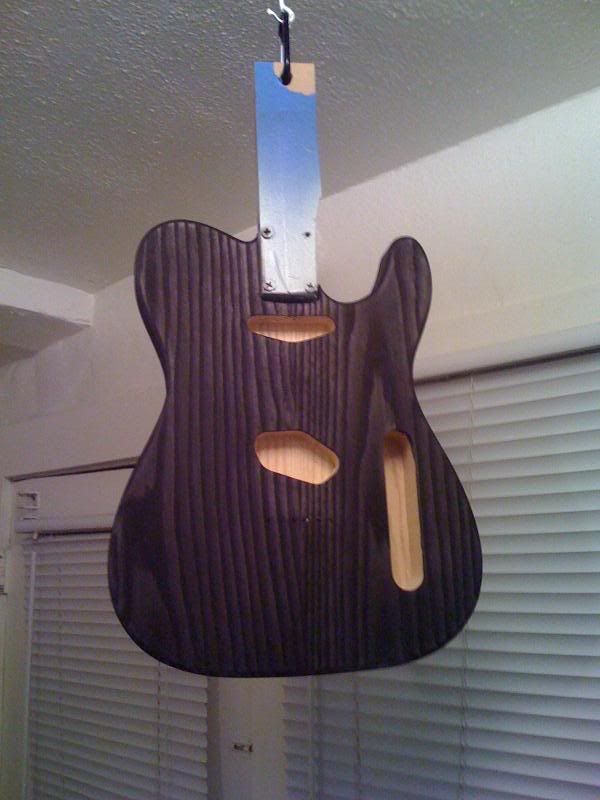
On that note...this guitar body is done, and is off to the finishing stage. This guitar is going to get a transparent black stain, sealed, filled, and then a thin gloss coat of Nitrocellulous lacquer. More on that in the next blog. In the meantime here's a teaser of the body...
Wednesday, March 9, 2011
What wood you do?
I've been wanting to update this page for a while, so I thought I'd start off talking bit about what has taken up all my time. 'twas once a time when being in a relationship or going full-force in a band was what occupied my time....now its wood.

Not sure, but I think I have this "collectors" disease. I saw it when I collected action figures. I was the admirable member of the comic-con community with my collection. Then I stopped collecting them, I sold them off and then it became having as many guitars as I possibly could. Most of the time I became broke doing this, so in-they-came, and out-they-went. Some were around for as little as two weeks before they were re-sold. It's tough to invest hundreds of dollars into an item and then realize that the gas and electric bill still needs to be paid, or my car could use a tune up. I think I had simmered down a bit, until I got the wood working bug. But in retrospect its not really anything new...its a morph of my original Guitar Acquisition Syndrome (GAS)...the woodworking I'm doing is to build custom guitars. So I found myself sniping auctions on ebay for exotic woods to build these guitars.

After that one was complete I quickly snatched up 3 blanks worth of ash, and began into 2 telecasters and 1 jazzmaster. The jazzmaster sadly was whoops'd and sold off to some guy in France so that I could avoid my shame of poor woodworking. The other two made also had a few whoops' but made their way down the assembly line and were given to two good friends of mine: my drummer of 10+ years Jason Vick and my former coworker & amp/guitar aficionado Mike Vella.
Jason always wanted to borrow one of my guitars but I was a bit protective of my "babies" so I built him a custom one-pickup "Esquire" in transparent purple to match his Noble & Cooley drumset. I presented it to him on his birthday in Oct 2010. Mike was a Gibson player, but always wanted a natural ash tele with a rosewood fingerboard. Fender only made that combination in the $1,000+ American series. Since Mike had two Les Pauls -- a Gold Top with P90s and a sunburst with humbuckers, I made his with Duncan humcancelling P90 neck and a tele sized '59 humbucker bridge pickup. Similar to Jason's, I presented Mike's guitar to him just after his birthday in August of last year, although finished it sometime in Nov 2010.
Jason's Esquire (mocked up)

Mike's Tele

I soon started hunting down deals on wood to build the next. Most of the time I scored great deals on the wood for dirt cheap. I made them out of wenge, leopardwood (a type of lacewood/sycamore), makore (African cherry), limba (aka black korina), zebrawood, mahogany, alder, and ash, and topped them with figured woods like crotch walnut, curly maple, flamed redwood, as well as matched the core woods on the wenge and leopardwood and zebrawood. I'd make one guitar, sell it and it'd cover the cost of the wood, but I'd still have enough wood to make another for myself. It generally worked out well as teh first ones tended to have some sort of "whoops" in them.
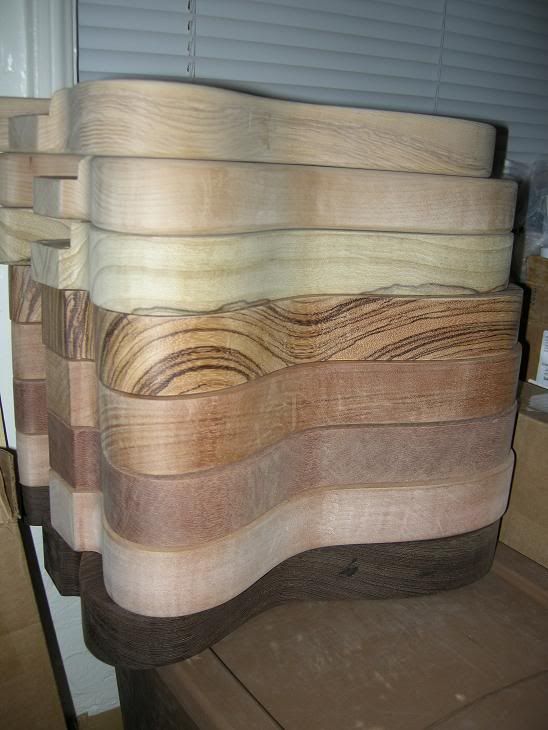
Here's a stack of tele bodies shaped (top to bottom: ash, alder, limba, zebrawood, African mahogany, lacewood, mahogany, wenge).

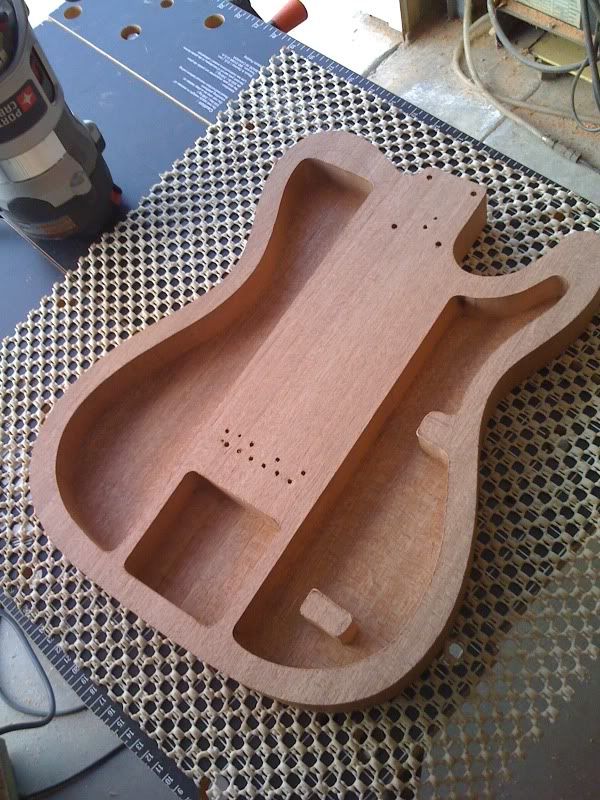
Since some of them began to weigh a bit more than a reasonable amount (normally 5-6lbs) I decided to hog them out and make thinline version of the Tele. The wenge weighed in over 10lbs and the leopardwood just under 10lbs and the zebrawood around 7+lbs. Not really easy on the back. The process of thin-lining a tele is cutting out part of the core body then covering it with a top.
Here's the rough cut:

The smoothed out version:

The glue up:

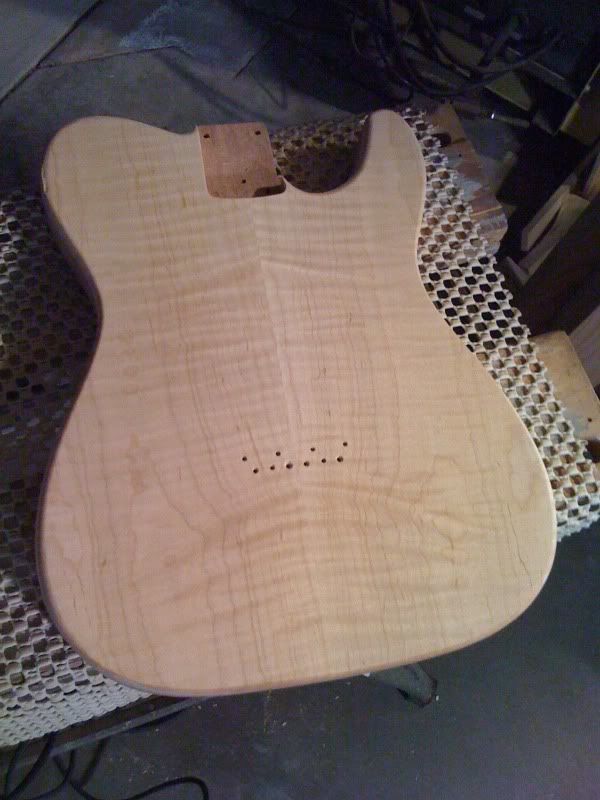
The final product (prior to cutting pickup holes):

In 2010 I spent over $2,000 in wood and a few tools (starting in the summertime). My first post tax return purchase for 2011 will be a $1000 drum sander. I have enough wood for approximately 19 projects and can probably do at least 10 tops to be put on other guitars. That's close to 30 guitars.
Sounds ridiculous right? Who really needs that many guitars? Well, I've come to accept the answer is "not me". I enjoy the building. I enjoy being the only one in my dad's garage for 8hrs listening to the buzz and hum of tools with the occasional ipod track poking thru. No phone calls, no internet, no girls bugging me, no band member's ego's pissing me off. Just me doing what I enjoy. There is one downside I noticed--once its built, I kind of don't have the interest to play it. Or at least with the last three they fell under the "meh" category. They just sit in the case and I play on it out of pity. But then again these were just tester's to see what that type of wood sounded like, so I don't feel that bad.
But now that my skills have gotten better, I'm now trying to build my "perfect" kickass guitar and will be just selling the others off to justify and fund the purchase of new wood. I'm looking to build the necks next, and then after that carved tops and glue in necks and then acoustics. From there I definitely will be making guitars that rival their $3000 custom shop models available from other builders. In the meantime I'm learning as I go. breaking even with cost, and usually getting a new guitar out of it. My dad actually enjoys that he gets to see me every single weekend both days. We're both a creature of the same nature, nerding ourselves in calculations and holing ourselves up in the garage on projects. As I get older I enjoy the fact I do get to see him. Band life. My own life. Whatever life I lead, I sometimes forget to make time for my family. So this new direction is a win-win to me.
Well at least until I cut off a finger or something...then that will suck balls.
til next post...

Not sure, but I think I have this "collectors" disease. I saw it when I collected action figures. I was the admirable member of the comic-con community with my collection. Then I stopped collecting them, I sold them off and then it became having as many guitars as I possibly could. Most of the time I became broke doing this, so in-they-came, and out-they-went. Some were around for as little as two weeks before they were re-sold. It's tough to invest hundreds of dollars into an item and then realize that the gas and electric bill still needs to be paid, or my car could use a tune up. I think I had simmered down a bit, until I got the wood working bug. But in retrospect its not really anything new...its a morph of my original Guitar Acquisition Syndrome (GAS)...the woodworking I'm doing is to build custom guitars. So I found myself sniping auctions on ebay for exotic woods to build these guitars.
The first shape I made was the Telecaster. Its' fairly simple. Front and back (the biggest surface areas) are flat and parallel. Its just a matter of cookie-cutting the shape out. I got the first itch a few years back just prior to Vocoder. I worked with my bass player Phil Ebner at a cabinet making shop and I convinced them to help me build a guitar. They did the most work as my skill level was not quite up to par at that time. Here's the guitar at Vocoder's new year's show.

After that one was complete I quickly snatched up 3 blanks worth of ash, and began into 2 telecasters and 1 jazzmaster. The jazzmaster sadly was whoops'd and sold off to some guy in France so that I could avoid my shame of poor woodworking. The other two made also had a few whoops' but made their way down the assembly line and were given to two good friends of mine: my drummer of 10+ years Jason Vick and my former coworker & amp/guitar aficionado Mike Vella.
Jason always wanted to borrow one of my guitars but I was a bit protective of my "babies" so I built him a custom one-pickup "Esquire" in transparent purple to match his Noble & Cooley drumset. I presented it to him on his birthday in Oct 2010. Mike was a Gibson player, but always wanted a natural ash tele with a rosewood fingerboard. Fender only made that combination in the $1,000+ American series. Since Mike had two Les Pauls -- a Gold Top with P90s and a sunburst with humbuckers, I made his with Duncan humcancelling P90 neck and a tele sized '59 humbucker bridge pickup. Similar to Jason's, I presented Mike's guitar to him just after his birthday in August of last year, although finished it sometime in Nov 2010.
Jason's Esquire (mocked up)

Mike's Tele

I soon started hunting down deals on wood to build the next. Most of the time I scored great deals on the wood for dirt cheap. I made them out of wenge, leopardwood (a type of lacewood/sycamore), makore (African cherry), limba (aka black korina), zebrawood, mahogany, alder, and ash, and topped them with figured woods like crotch walnut, curly maple, flamed redwood, as well as matched the core woods on the wenge and leopardwood and zebrawood. I'd make one guitar, sell it and it'd cover the cost of the wood, but I'd still have enough wood to make another for myself. It generally worked out well as teh first ones tended to have some sort of "whoops" in them.
Here's a stack of tele bodies shaped (top to bottom: ash, alder, limba, zebrawood, African mahogany, lacewood, mahogany, wenge).
Since some of them began to weigh a bit more than a reasonable amount (normally 5-6lbs) I decided to hog them out and make thinline version of the Tele. The wenge weighed in over 10lbs and the leopardwood just under 10lbs and the zebrawood around 7+lbs. Not really easy on the back. The process of thin-lining a tele is cutting out part of the core body then covering it with a top.
Here's the rough cut:
The smoothed out version:
The glue up:

The final product (prior to cutting pickup holes):
In 2010 I spent over $2,000 in wood and a few tools (starting in the summertime). My first post tax return purchase for 2011 will be a $1000 drum sander. I have enough wood for approximately 19 projects and can probably do at least 10 tops to be put on other guitars. That's close to 30 guitars.
Sounds ridiculous right? Who really needs that many guitars? Well, I've come to accept the answer is "not me". I enjoy the building. I enjoy being the only one in my dad's garage for 8hrs listening to the buzz and hum of tools with the occasional ipod track poking thru. No phone calls, no internet, no girls bugging me, no band member's ego's pissing me off. Just me doing what I enjoy. There is one downside I noticed--once its built, I kind of don't have the interest to play it. Or at least with the last three they fell under the "meh" category. They just sit in the case and I play on it out of pity. But then again these were just tester's to see what that type of wood sounded like, so I don't feel that bad.
But now that my skills have gotten better, I'm now trying to build my "perfect" kickass guitar and will be just selling the others off to justify and fund the purchase of new wood. I'm looking to build the necks next, and then after that carved tops and glue in necks and then acoustics. From there I definitely will be making guitars that rival their $3000 custom shop models available from other builders. In the meantime I'm learning as I go. breaking even with cost, and usually getting a new guitar out of it. My dad actually enjoys that he gets to see me every single weekend both days. We're both a creature of the same nature, nerding ourselves in calculations and holing ourselves up in the garage on projects. As I get older I enjoy the fact I do get to see him. Band life. My own life. Whatever life I lead, I sometimes forget to make time for my family. So this new direction is a win-win to me.
Well at least until I cut off a finger or something...then that will suck balls.
til next post...
Subscribe to:
Posts (Atom)